Opto Acoustic Noise Canceling Headphones: Difference between revisions
(Created page with "=Opto Acoustic Headphones= *[https://www.optoacoustics.com/medical/optoactive-ii Product Site] =Setup= # Turn on power (top-right button on the back of the unit) and the displ...") |
|||
| (22 intermediate revisions by 2 users not shown) | |||
| Line 1: | Line 1: | ||
Slim over-the-ear headphones with an active noise cancellation (ANC) feature. | |||
*[https://www.optoacoustics.com/medical/optoactive-ii Product Site] | *[https://www.optoacoustics.com/medical/optoactive-ii Product Site] | ||
=Setup= | =Setup= | ||
# Turn on power (top-right button on the back of the unit) and the display should appear. | '''Please use the sanitary headphone covers located in the middle cabinet inside the scanner room.''' | ||
# Make sure the audio cable isn't plugged into anything | Do not clean the headphones with the wipes. Commercial cleaning products will cause the material to degrade and crack over time. We will then have to repair the headphones with electrical tape or replace them. | ||
# During | |||
#*If calibration is successful, a green checkmark will appear next to the Left and Right calibration boxes. | # Turn on power (top-right button on the back of the unit) and the display should appear (image 1 below). | ||
# Make sure the audio cable isn't plugged into anything. Touch "Touch screen to continue" and then "Start" to move to the calibration screen (2). | |||
# Firmly touch "Calibrate" to begin calibration. During this step, absolute silence is necessary--no scanner noise and no audio. | |||
#*If calibration is successful, a green checkmark will appear next to the Left and Right calibration boxes. (3) | |||
# Once calibrated successfully, touch the ANC button in the upper right-hand corner of the screen. | # Once calibrated successfully, touch the ANC button in the upper right-hand corner of the screen. | ||
# | # Touch "Learn" to begin the algorithm's learning phase. (4) | ||
#* This sequence should be run before the task sequence and allows the noise cancellation algorithm to learn the noise coming from the scanner. | #* This sequence should be run before the task sequence and allows the noise cancellation algorithm to learn the noise coming from the scanner. | ||
#* If the audio cable is plugged in, make sure no audio is being played or else the learning will fail. | #* If the audio cable is plugged in, make sure no audio is being played or else the learning will fail. | ||
#* The learning sequence should be at least 30 seconds long and should be the same exact sequence type being used for your fMRI tasks. | #* The learning sequence should be at least 30 seconds long and should be the same exact sequence type being used for your fMRI tasks. (5) | ||
# Once the learning phase is complete, there should be a significant decrease in the scanner noise heard by the participant. | # Once the learning phase is complete, check that the yellow status box that said "Learn" is now green and says "Noise Cancellation". If it doesn't (e.g., it reads "Idle" or "Passive" instead), press the ANC button. The status should change and there should be a significant decrease in the scanner noise heard by the participant. (6) | ||
#* This is signified by the decrease in the dB value and the dB waveform seen on the screen for each ear. | #* This is signified by the decrease in the dB value and the dB waveform seen on the screen for each ear. | ||
#* Note that in Image 6, the red line is flat because the sequence had been stopped at the time the picture was taken. During your active scan with noise cancellation being performed, the red line should look similar to the blue line. | |||
# The algorithm will remain active unless stopped by the user or the system (see Troubleshooting). | # The algorithm will remain active unless stopped by the user or the system (see Troubleshooting). | ||
# Press STOP if you wish to pause the application of noise cancellation (e.g., to talk to the participant). Press ANC to start it again. | |||
# Press the switch on the back of the box to turn everything back off at the end of your scan. Leaving the unit on for long periods of time may cause it to exhibit unusual behaviors, such as struggling to turn back on again. | |||
<gallery> | |||
opto_homescreen.jpg|1|1. Home display when power is first turned on. | |||
opto_start.jpg|2|2. Touch screen to continue, then touch "Start". | |||
opto_cal_complete.jpg|3|3. Calibration successful. | |||
opto_learn.jpg|4|4. System ready to learn noise pattern. | |||
opto_learning.jpg|5|5. 1.7 seconds until learning complete. | |||
opto_ANC.jpg|6|6. Noise cancellation is active. | |||
</gallery> | |||
=Troubleshooting= | |||
==Issues With ANC== | |||
===Unit Won't Turn On=== | |||
*This may happen if a group forgets to turn the system off at the end of their session and it stays on for a long time before finally being switched off. Turn the unit off and leave it off for some time, perhaps while you are setting up and registering your participant. Try pressing the switch again and repeat until it turns on. It may take a few cycles of switch flipping, but the unit has always come back on before long. | |||
===Noise Cancellation Stops=== | |||
*The most common reason that noise cancellation stops completely is because the stimulus presented is too loud and overshoots the safety threshold (111dB). | |||
*This can be avoided by making sure the volume on your stimulus machine is at max and you can control/adjust the volume of the headphones using the 'Line 1' dial on the top of the unit. | |||
**Doing a volume test before your scan starts can help. | |||
**Start with the 'Line 1' volume dial in the middle (facing the top), and adjust as needed. | |||
'''Note: There is no need to adjust the 'Line 2' volume dial, it doesn't do anything to affect the sound unless you have two volume sources!''' | |||
===Noise Cancellation Fading=== | |||
*Studies that run numerous functional tasks, or have sequences in between functional runs that don't use the ANC function, will notice that over time the algorithm used to produce the noise cancellation may fade and the quality of the noise cancellation will diminish. | |||
*The most effective way to avoid this is adding another short learning sequence into your protocol. | |||
*Stopping the algorithm just before the end of your sequence and starting the algorithm again just after your next sequence starts up again has proven somewhat effective in keeping the ANC feature intact. | |||
===Audio Output is Unbalanced=== | |||
= | *Check the knob in the upper left corner of the back of the unit. Turn it until the dot at the top of the dial is lined up in the middle. The knob should always stay in this position, as it ensures that the audio will not be played in one ear more than the other. | ||
Latest revision as of 00:03, 2 March 2024
Slim over-the-ear headphones with an active noise cancellation (ANC) feature.
Setup
Please use the sanitary headphone covers located in the middle cabinet inside the scanner room. Do not clean the headphones with the wipes. Commercial cleaning products will cause the material to degrade and crack over time. We will then have to repair the headphones with electrical tape or replace them.
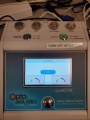
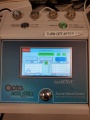
- Turn on power (top-right button on the back of the unit) and the display should appear (image 1 below).
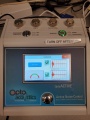
- Make sure the audio cable isn't plugged into anything. Touch "Touch screen to continue" and then "Start" to move to the calibration screen (2).
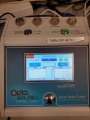
- Firmly touch "Calibrate" to begin calibration. During this step, absolute silence is necessary--no scanner noise and no audio.
- If calibration is successful, a green checkmark will appear next to the Left and Right calibration boxes. (3)
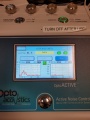
- Once calibrated successfully, touch the ANC button in the upper right-hand corner of the screen.
- Touch "Learn" to begin the algorithm's learning phase. (4)
- This sequence should be run before the task sequence and allows the noise cancellation algorithm to learn the noise coming from the scanner.
- If the audio cable is plugged in, make sure no audio is being played or else the learning will fail.
- The learning sequence should be at least 30 seconds long and should be the same exact sequence type being used for your fMRI tasks. (5)
- Once the learning phase is complete, check that the yellow status box that said "Learn" is now green and says "Noise Cancellation". If it doesn't (e.g., it reads "Idle" or "Passive" instead), press the ANC button. The status should change and there should be a significant decrease in the scanner noise heard by the participant. (6)
- This is signified by the decrease in the dB value and the dB waveform seen on the screen for each ear.
- Note that in Image 6, the red line is flat because the sequence had been stopped at the time the picture was taken. During your active scan with noise cancellation being performed, the red line should look similar to the blue line.
- The algorithm will remain active unless stopped by the user or the system (see Troubleshooting).
- Press STOP if you wish to pause the application of noise cancellation (e.g., to talk to the participant). Press ANC to start it again.
- Press the switch on the back of the box to turn everything back off at the end of your scan. Leaving the unit on for long periods of time may cause it to exhibit unusual behaviors, such as struggling to turn back on again.

1. Home display when power is first turned on.
2. Touch screen to continue, then touch "Start".
3. Calibration successful.
4. System ready to learn noise pattern.
5. 1.7 seconds until learning complete.
6. Noise cancellation is active.


Troubleshooting
Issues With ANC
Unit Won't Turn On
- This may happen if a group forgets to turn the system off at the end of their session and it stays on for a long time before finally being switched off. Turn the unit off and leave it off for some time, perhaps while you are setting up and registering your participant. Try pressing the switch again and repeat until it turns on. It may take a few cycles of switch flipping, but the unit has always come back on before long.
Noise Cancellation Stops
- The most common reason that noise cancellation stops completely is because the stimulus presented is too loud and overshoots the safety threshold (111dB).
- This can be avoided by making sure the volume on your stimulus machine is at max and you can control/adjust the volume of the headphones using the 'Line 1' dial on the top of the unit.
- Doing a volume test before your scan starts can help.
- Start with the 'Line 1' volume dial in the middle (facing the top), and adjust as needed.
Note: There is no need to adjust the 'Line 2' volume dial, it doesn't do anything to affect the sound unless you have two volume sources!
Noise Cancellation Fading
- Studies that run numerous functional tasks, or have sequences in between functional runs that don't use the ANC function, will notice that over time the algorithm used to produce the noise cancellation may fade and the quality of the noise cancellation will diminish.
- The most effective way to avoid this is adding another short learning sequence into your protocol.
- Stopping the algorithm just before the end of your sequence and starting the algorithm again just after your next sequence starts up again has proven somewhat effective in keeping the ANC feature intact.
Audio Output is Unbalanced
- Check the knob in the upper left corner of the back of the unit. Turn it until the dot at the top of the dial is lined up in the middle. The knob should always stay in this position, as it ensures that the audio will not be played in one ear more than the other.