Eye Tracking: Difference between revisions
Jump to navigation
Jump to search
| Line 1: | Line 1: | ||
= EyeLink = | = EyeLink = | ||
=== MR Compatible EyeLink 1000 === | === MR Compatible EyeLink 1000 === | ||
*CCN is equipped with an in-bore [https://www.sr-research.com/fmri-meg-systems/ EyeLink 1000] | *CCN is equipped with an in-bore [https://www.sr-research.com/fmri-meg-systems/ EyeLink 1000 Plus - Long Range] | ||
== Specifications == | == Specifications == | ||
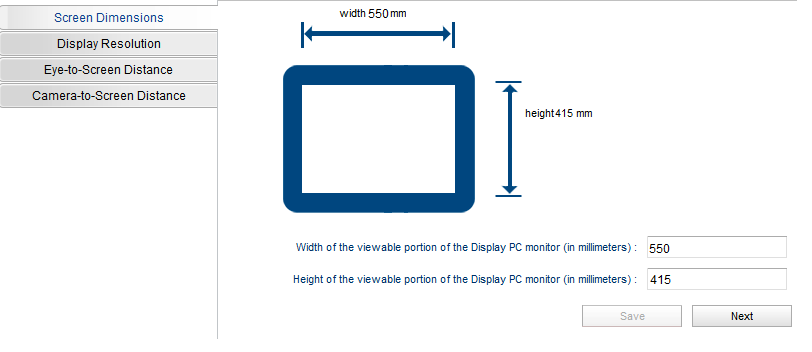
[[File:Image-size-projector-screen.png]] | [[File:Image-size-projector-screen.png]] | ||
Latest revision as of 19:33, 15 February 2024
EyeLink
MR Compatible EyeLink 1000
- CCN is equipped with an in-bore EyeLink 1000 Plus - Long Range
Specifications
Setup
In Scanner
- The eyetracker is installed in the back of the bore. It should stay behind the blue tape marking the best position on the rail.
- There are three cables that need to be attached when you begin an eyetracking session:
- Two thick, black cables: Power cables. Plug them into the two round ports on the back of the eyetracker (doesn't matter which one goes on which side).
- One skinny, orange cable connected to a blue cable: Fiber optic cable. Plug it into its port on the back of the eyetracker.
- Remove the lens cap. Place it somewhere nearby so you can find and replace it again easily when your scan is complete.
- There is another camera mounted to the inside of the bore, right above the eyetracker. You may want to unplug this camera before you being your eyetracking session, as the infrared light it emits may interfere. If you unplug this camera, please remember to plug it back in when your scan is finished.
- If your group is finding it difficult to re-plug the camera after scans, whether it be due to time or memory constraints, you may find it helpful to simply cover the camera using one of the mesh headphone covers. This is an acceptable alternative as long as you are mindful not to use an excessive number of covers per week.
- At this point, the Eyelink desktop computer in the control room can be turned on. The camera now needs to be aligned so that it points at the participant's (usually right) eye, reflected in the mirror.
- Remember to use the mirror dedicated to eyetracking, not the usual coil mirrors. The eyetracking mirror is stored in the control room cabinet and labelled with EYETRACKER.
- Do not clean this mirror using the wipes. They will degrade the reflectiveness over time. Use the special cleaning products stored in the same cabinet that the EYETRACKER mirror itself is kept in.
- Once the participant is inside the bore, adjust the alignment as necessary. You may need to play around with both wheels until a stable image is achieved:
- Wheel close to lens: Focus wheel.
- Wheel close to base: Aperture wheel.
- Large knob near the base: Adjust eyetracker positioning in all directions.
In Control Room
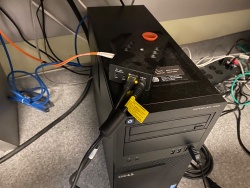
- At the Eyelink station on the right side of the room, there is a cable with a yellow tag on it and is attached to a battery box labelled EYELINK (pictured below). This is the transducer cable--plug it into the rightmost port (labelled with "12V") on the box on top of the tower unit.
- Plug the eyetracker ethernet cable into your task computer. This will be the blue cable labelled EYELINK.
- Make sure your computer network is set to use this connection. This will be how your computer communicates with the Eyelink station to run calibration and record fixations when your scan starts.
- Once the cables are connected to the eyetracker in the bore, turn on the tower unit. You will likely get errors if you try to power on before those cables are connected.
- The main Eyelink menu screen should appear, now that all the cables are connected and the computer is powered on.
Calibration
- Click on the center of the eye to put the red circle around the pupil.
- Set the thresholds so that the cross locks on to the center of the pupil and maintains as stable a tracking as possible:
- Start by clicking "Auto Threshold". Eyelink will give you its best estimate of what threshold values give you the most accurate capture of pupil and corneal reflection.
- Adjust the pupil threshold until the dark blue (pupil) fills as much of the pupil as possible without including too much non-pupil (e.g., eyelashes).
- Adjust the CR threshold until the light blue (corneal reflection) circumscribes a spot on the pupil without including too much non-CR (e.g., the coil).
- Once the threshold settings are as stable as you can get them, click "Calibrate" on the right side of the screen to begin calibration.
- The details of running the calibration will depend on how the corresponding script is written on your task computer's side. You will need some code that tells Eyelink when to present a fixation cross and when to accept fixations.
- This can be a relatively simple Matlab script with just a few commands for having the user decide when to show a cross, accept a fixation, show the next cross, and exit the script when calibration is done.
- "Auto-trigger" is off by default. You will most likely want to keep this off.
- Other settings will depend on your lab's preferences. For example, there are different calibration types that will present fixation points in various configurations, such as a row of three, a triangle, a five-point cross, or a full-screen grid. "Force Manual Accept" will tell Eyelink that you want the program to wait for you to press a key in order to accept the calibration attempt on a particular fixation point before moving on. There are a number of other settings--make a note of what your lab wants to do so it will be consistent across all your participants.
- If you are using manual accept, you generally want to accept a corresponding fixation very quickly after presenting a cross. This is because a person's immediate saccade to a new fixation point tends to be the most accurate. Once they fixate, the eye often drifts off even if the person feels like they are still focused on the cross.
- During calibration, the crosses look like they appear at the edges of the screen while the fixations do not. This is normal--the fixations will look clustered around the center of the screen, but as long as they make a generally rectangular shape, calibration is working correctly.
- Click "Accept" and "Validate" to validate the calibration once it's complete. This will run you through another (similar, but not identical) process to verify the calibration results.
Troubleshooting
- If everything seems set up correctly and you see nothing on the Eyelink windows:
- Make sure the lens cap is off.
- Make sure your task computer is connected to the Eyelink computer. This is typically done with the ethernet cable, so check that it is firmly connected and your network settings are configured to use it.
- If you still see nothing, restart the program. Quit Eyelink, check the cable connections on the tracker in the bore, then click the square button at the top left of the desktop screen to launch Eyelink again.
- If everything seems set up correctly, but you notice a green "D" and green crosshairs (instead of white) during calibration:
- The eyetracker thinks it is detecting the left eye. We usually track the right eye because that is where the camera is typically and stably positioned--over where the right eye is visible through the coil.
- To switch eyes, return to the main menu where you have the thresholding controls for pupil and CR. Look near the bottom of the screen--there are buttons for left and right eye in the "Eye Tracked" window. Click the "Right" button.
- Now click the pupil to direct Eyelink to the area you know it should focus on. The participant view window may flash light blue and refuse to keep the yellow box centered around the pupil. If this happens, it means the CR thresholding is way off (likely due to the left/right confusion). Increase or decrease it until it starts to look sensible again and allows you to focus the yellow box around the pupil. Now adjust the pupil thresholding as usual and try calibration again.
- If the Eyelink computer is alerting you to a filename error, check the ID you are using to identify your participant on your task laptop (or whichever computer you have connected to the Eyelink system). Make sure it is at most 8 characters long.
- Eyelink runs on an old DOS system, which limits filenames to 8 characters or less. You can still register the participant on the console using whatever naming convention you'd like, but any string that will end up being used by Eyelink to save files will need to adhere to the character limit.


